Guide to Ordnance

|
This page needs revising!
The following page is out of date and/or needs to be revised. If the page's guide needs revision, see here for an example. |
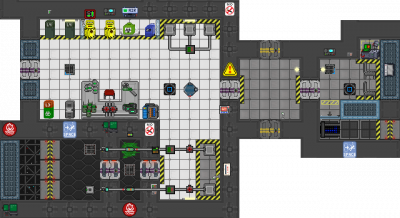
Toxins is a section of the Research and Development section of the station. It is used to create bombs for mining or, in an emergency, to destroy a loose singularity, and otherwise ruin the station if left to traitors or idiots.
Heating Gas

The first thing you should do in the Toxins Lab is open the interior airlock of the heating chamber, go inside the airlock and set both pumps to 4500 kPa then leave, making sure the airlock is cycled shut behind you. There is a very good reason to make sure that airlock stays closed, and you never get stuck inside.
After this you need to leave Toxins, go up the hallway and through the purple doors into Toxin Storage, you'll want to grab 2 Plasma Canisters and an Oxygen Canister for now.
Once you've gathered these Canisters put them onto the 3 ports in the upper right corner of the room then grab a Wrench (if there isn't one around, there should be some in blue toolboxes in the R&D office at the top of the hall), then use the wrench on each Canister to connect them to the ports. Once connected there should be a black pipe going from Canister to the floor.
DO NOT open the Canister valves! This will release toxins into the air immediately and you do not want that! The Canisters will mix on their own as soon as they are wrenched in the connectors.
Use your PDA to check the contents of one of the Canisters, it should be 66% plasma and 33% oxygen, if it isn't, then you've done something wrong.
Once you've made sure your Canisters have the correct contents, use the wrench to disconnect the Canisters, drag one onto the INPUT connector port on the south-wall of Toxins. Then open the INPUT valve so the contents of the Canister are pumped from the Canister to the mixing chamber. If you changed the pump settings correctly, it's quite likely that a light bulb will smash and ignite the mix for you; if not, you can use the ignition switch on the wall of the airlock to do so.
Once you ignite the burn chamber, grab an empty yellow CAUTION Canister and wrench it to the top OUTPUT connector port. This Canister will hold your final superheated mix.
When the burn chamber is an inferno, turn the top OUTPUT valve on. Once the temperature in the canister reaches 200C to 400C, unwrench it, and let it combust inside the canister for a minute or two. When it reaches a temperature of 10000C to 20000C, wrench it back to the OUTPUT connector port, and turn the OUTPUT manual valve off. This helps stop it from continuing to combust, and stabilizes the temperature. However, if you want the gas to be HOTTER you can keep it unwrenched until combustion burns all of the plasma and oxygen away.
And if all is done correctly your yellow Canister should now be flashing green, and when checked with your PDA Gas Scanner or Analyzer should have a temperature of about 5000C to 10000C! Feel free to repeat this process with the other yellow Canister if you wish.
Make sure not to disconnect the yellow Canister, or else it will continue to heat up rather than stay at a stable temperature.
While this method produces very hot gas, the gas is (mostly) CO2. In order to make a bomb you will require heated Plasma, this can be achieved by stabilizing the canister's temperature as mentioned before so that it does not turn too much in to CO2, or by pumping the gas into a tank that already contains plasma to heat it up as described below. However, a larger explosion is possible if you have a hot tank of pure plasma without mixing in any CO2. Other methods are possible, have fun experimenting and try not to destroy the station too many times.
|
Sealing the Deal - Putting Together a Bomb
Now you've got your superheated gas. Next you'll want to go and get an Oxygen Canister from the storage and bring it back down to the Toxins Room, you'll be using this to top off Oxygen Tanks from the dispenser to your right, where the yellow Canisters were.
Now you'll want to start off by dispensing one or two Plasma Tanks from the Tank Storage Unit, load into the white Portable Scrubber, making sure it's pressure is set to 1013 kPa, and get rid of all that plasma. Then take the Plasma Tanks to a Plasma Canister and put a small amount of plasma in the tank, setting the pressure to 50 kPa will work, but experiment with different amounts to change the size of the explosion. Once this is done go and slot them into one of your yellow Canisters, making sure that the output pressure is at 1013 kPa. This should result in a high pressure, high temperature tank of (mostly) plasma.
|
|
Now take these tanks of heated gas and attach each one to a Tank Transfer Valve, once you've done that it's back to the dispenser. This time get an equal amount of Oxygen Tanks from the Tank Storage Unit and fill them with oxygen from the Oxygen Canister you got at the start of this section, again make sure the pressure is set to 1013 kPa. Now attach each to a Tank Transfer Valve that already has a Plasma Tank on and you'll have a bomb, or several.
|
From here on you have 6 options, Timers, Proximity Sensors, Remote Signaling Devices, Voice Analyzers, Health Sensors or Infrared Emitters. Each of these is a method of setting off your bomb, for your first bomb you should use a Remote Signaling Device. To attach these devices to a Tank Transfer Valve you need to use a screwdriver on them till they are ready for attachment. Grab a Remote Signaling Device click it to set a frequency of your choice, then use it on the Tank Transfer Valve to attach it, all done, you have a bomb, ready for use.
|
|
|
|
|
|
|
Important Note about Remote Signaling Devices
Some jokers like to randomly signal the default frequencies of these devices so either before or as soon as you've attached one to a bomb you'll want to open its control panel by clicking it or the bomb in your hand and change the frequency and code so that you don't get a nasty surprise.
Guide to Maximum Capacity Bombing
Ever tried to make max cap bombs and fucked up because you don't quite understand the logistics? Just want to make your bombs better using just ONE SIMPLE TRICK? Do you want to become the station's hero by suicide bombing the guy murderboning with a dual-bladed energy sword? Then this guide is for you. In this guide, I'll explain how I make maximum capacity bombs as well as some of the ideas behind it, so you're not left feeling confused.
Please note that you don't HAVE to do this in the exact order below, but it is recommended.
- Grab an Oxygen Canister from Toxins Storage and slap it on a connector near the freezer, and set the temperature to 73.15K or -200C.
- (optional) If you have acquired a Rapid Piping Device, either from the Auxiliary Base Construction above Arrivals or Atmospherics, make an arrangement like so [1] using a volume pump so that you can fit more Oxygen in one canister. Also, if you have a Rapid Piping Device, consider using Heat Exchangers for more precise heating. There's a lot you can do with them!
- Grab TWO Plasma Canisters and ONE Oxygen Canister. Wrench them into the mixing ports in the Toxins Lab, and unless you fucked it up somehow, ALL THREE Canisters should read 66% Plasma and 33% Oxygen (if you're not sure that it's the proper amount, enable the Gas Scanner on your PDA or use an Analyzer and check the Canisters with it).
- Why use 66% Plasma and 33% Oxygen? In the Toxins Lab, you use this specific mixture because there are only three connector ports and it's easy to make (a more efficient mix would be more like 90% Plasma and 10% Oxygen using Gas Mixers), but the basic explanation is that Plasma combusts with Oxygen when heated to at least 373.15K (100C). This heats the Plasma mixture (good for your bombs), but also produces a lot of Carbon Dioxide (does nothing for your bombs). This means you don't want the mix to be too hot, lest you create a dud bomb with almost no pure Plasma in it.
- To save time and maximize efficiency, open the INTERIOR door on the burn chamber, and set both gas pumps inside to 4500 kPa.
- Unwrench ONE canister of your burn mix, and place it on the INPUT connector port near the burn chamber.
- Grab an empty yellow CAUTION Canister and wrench it on to the OUTPUT connector port near the burn chamber.
- Turn the INPUT (BOTTOM) valve on. Once the entire burn chamber is filled with delicious, delicious Plasma, you can hit the ignition switch.
- This part may confuse some people who are used to heating up their gas for a long time in the burn chamber: When the plasma ignites, check the gas meter on the OUTPUT line (TOP) near the burn chamber until the gas inside reaches 100C, or 373.15K. Then, turn on the OUTPUT valve and let er' fill up your yellow gas canister.
- Why only bring it up to 100C, you may ask? There's a very powerful reason for this: This is around the temperature that Plasma and Oxygen will start to combust. Letting the Canister combust inside is much easier to control (you can practically stop it by just wrenching it down on a connector, making it much more stable and allowing you to fine tune it a bit easier), and it goes by much faster than using the burn chamber. You might also be thinking that you could just use the heater to heat a burn mix Canister to 100C, and you're totally right! However, the burn chamber is closer to your canisters and the Toxins Lab anyway, and setting up the heater for use is a bit more annoying than setting up the freezer.
- Wait for a little bit while your yellow Canister combusts. Check it periodically with your Analyzer or PDA Gas Scanner. Once the temperature inside reaches 8000 to around 11000C (8000C is preferable but anywhere between is pefectly OK), wrench the canister down on to the connector, and turn the OUTPUT valve off. Now, your heated Plasma canister is ready! Make sure to not unwrench it, or the whole gas mixture will keep combusting and you'll have to try again.
- Now, for the important part. By now, your Oxygen canister will have finished cooling. Grab it, and bring it up to the Toxins Lab near your heated Plasma canister.
- Then, take a Plasma and an Oxygen tank from the Tank Dispenser, and filter ONLY THE OXYGEN TANK using the Air pump in the Toxins Lab. This is very important: if you filter the Plasma tank as well, the whole mix might not explode at maximum capacity.
- Why do you not want to filter the Plasma tank? Think of the Ideal Gas Law. That really hot plasma you've been making actually doesn't contain that much pressure because of the relationship between temperature and pressure, and thus filling a tank full of 303 kPa of 20C Plasma will actually cool it down considerably, and fill it up with more Plasma.. When you connected the yellow Canister, it would have been at around 4000C to 5000C. Once you fill the Plasma tank, the tank will actually only be at 600C and will be full of 80%-97% pure Plasma, which is much better as I explained before (over a certain point, more heat actually hinders the bomb!). However, if you filter the tank first, it will be around 4000C to 5000C and contain mostly Oxygen and Carbon Dioxide, which is considerably worse than if you don't filter it. And on the plus side, it's easier to manufacture six (or more if Cargo complies) of these at once since you don't have to filter the Plasma tank every single time!
- Afterwards, set both the Oxygen and heated Plasma canisters output to 1013 kPa, stick the filtered Oxygen tank, and Plasma tank in to their respective canisters, and then open the valve. Once the Oxygen tank reaches 800-1013 kPa, TURN THE VALVE OFF and eject it. Do the same with the Plasma tank.
- Now, grab a Tank Transfer Valve and stick both of your tanks on to it.
- Decide how you want your bomb to detonate (if you want to attach a Timer, Proximity Sensor, or Remote Signaling Device use the screwdriver on the device to make it attachable and attach it to the Tank Transfer Valve).
Once you've completed this, you'll have an easy maximum capacity bomb in 4-10 minutes! Repeat steps 11-13 with your other Tank Transfer Valves if you wish.
If you're more of a visual learner, I created a quick and dirty speedrun of me making one of these bad boys here [2].
If you want to take your bomb escapades EVEN FURTHER BEYOND, I can give some tips:
- The game of creating bigger and bigger bombs is to pack AS MANY MOLES OF PLASMA AND OXYGEN AS POSSIBLE in to each tank. This is why you cool Oxygen and try to minimize heating Plasma.
- Think of some ways you can increase the mole count:
- In what ways can you pack more pressure in to one tank? Hint: There is a device in the Toxins Lab that lets you do just that.
- What's the least you can heat Plasma but still have it explode at maximum capacity (5/10/20) with -200C (73.15K) Oxygen?
- How can you apply what you've learned to make the BIGGEST BOOM that is possible?
Do some code diving (and boring MATH) or neat experimenting! The world is your oyster in the game of bomb creation.
WARNING WARNING
- Shitcurity MAY kick down your door and harm-baton you for making a bomb even if it's just to blow up Lavaland for PRECIOUS ORES.
- If you're not an antagonist and decide to mass bomb the station (or suicide bombing an antag such as a Wizard) you quite possibly will get BANNED!! In an extreme situation such as >90% of the crew dead because of a rampaging wizard, you can adminhelp if it's ok to give it a try, and if you don't receive an answer, presume that it is not ok.
Testing your creations
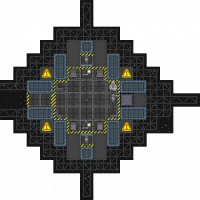
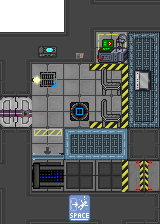
The Toxins department comes with a built in testing arena! It's great for testing the power and destruction of your newly created bombs. If you go out the right exit of Toxins and continue walking you will find yourself in a small room. The first things you will most likely spot will be the mass driver, the Doppler Array and the observation screens.
The Doppler Array will measure the explosions sizes for any explosions in its facing direction. The main use is to measure the theoretical size of the explosion, which is what the explosion would have been if it wasn't capped. Now, make sure your bomb is completely set-up and double-check it, then drop it on the mass driver and head over to its control. Click on the control and the bomb will be launched into the toxins test chamber. Now head over to the observation screens and click one of them, which will allow you to view the bomb explosion through the test chamber cameras.
This is the recommended way to test your creations. If you decide to test your bombs elsewhere, expect a wave of security to come and beat your ass for destroying parts of the station. Enjoy your explosions.
Using your creations
Bombs are designed to be used with mining to clear out regular rocks. If you’re a traitor you can also use bombs as a quick way to get the shuttle called, since you'll probably end up with only half a station afterwards.
If you choose to use bombs to EXPLODE Lavaland for ores (or for shits and giggles as a traitor), be wary that LAVALAND DOES NOT HAVE A MAXIMUM BOMB CAP! This means that if you create a beautiful 22/44/88 bomb and detonate it expecting a normal maxcap, it will probably vaporize half of Lavaland, the Mining Station and Gulag, as well as having the nasty side effect of killing you and some poor goliaths.
Final Warning
Seriously, don't go and randomly set these off on the station if you aren't a syndicate or otherwise an antagonistic character, you WILL get job-banned or permabanned.


