TGMC:Xeno Quickstart Guide

|
This page is a part of the TGMC wiki.
TGMC is a project based on the CM-SS13 codebase. |
Step 1: How to be a Xenomorph
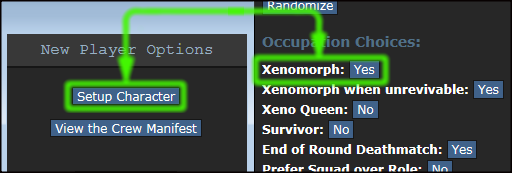
First, open your character preferences and find the Xenomorph option under Occupation Choices:

Now save, ready up, and you have a chance to spawn in as a Xeno larva at round start (or the Queen if you chose Yes to the Queen option, but don't do that until you've gotten some experience.)
If you didn't get a slot on the Xenomorph team, or if the round has already started, you can attempt to join later in the round as:
- burrowed larvae - burrowed larva are unused larva that have SSD'd and can be spawned into
- living alien - can take over a living alien if one is available (has been SSD for long enough.)
Or set your Toggle Special Roles to 'Xenomorph' in the game under the Preferences tab. This will allow you to spawn/respawn in an ongoing game if a larva becomes available, even if you previously played as a marine and died or entered cryostasis.
Step 2: Oh God, I'm a Worm! Now What?
You spawn in as a newborn Larva near your Queen or near a resin silo. Stay in a safe location—Larva are weak and have no attack, but are also fast and agile. You can freely move across window panes and squeeze under unbolted and un-welded doors by clicking on the door.
Take this time while you grow to familiarize yourself with the Xenomorph HUD and the Info/Text panels on the right. This guide will only cover what's different about the Xenomorph HUD from the marine and standard SS13 HUD. If you're totally unfamiliar with the SS13 interface, you'll definitely want to read some starter guides and may want to play a few rounds on a standard SS13 game mode server before jumping in here.
The Xenomorph HUD
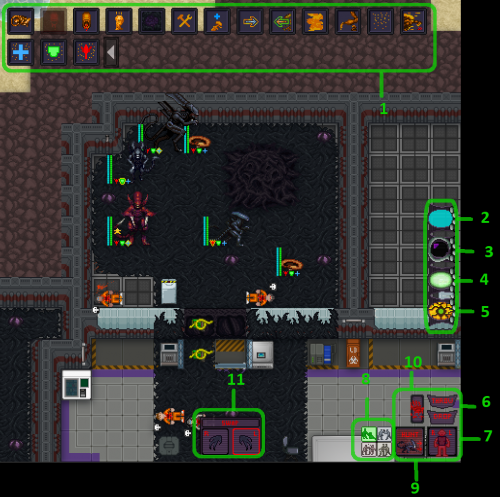
The image to the right shows the Xenomorph game screen. The HUD icons are highlighted and explained below. Note that as a larva, you'll only have some of these HUD icons.
- Xenomorph Abilities - These buttons across the top of the screen are your abilities. All Xenomorphs have the rest ability, which is used on weeds to recover health and plasma much faster, and all except the larva have the regurgitate ability to throw up any hosts they have devoured.
- Plasma Level - Plasma is used for all Xeno abilities. It regenerates quickly on weeds and much more slowly off of weeds, and can be replaced by certain classes such as the Drone.
- Hive Ruler Locator - Points to where either the Queen or Shrike is (in a general area, not perfectly accurate.)
- Health - Your health. When it drops to zero, you'll collapse into a critical state and will bleed out unless you're on weeds or an ally drags you onto them.
- Night-Vision Eye - Xenomorphs have perfect night-vision. Click this eye to toggle night-vision on and off to see the surrounding darkness.
- The buttons on the lower right corner and bottom are the same as their standard SS13 counterparts.
- Throw, Drop Buttons - Function the same as SS13. Default hotkeys are 'R' for throw and 'delete' for drop.
- Body-part Target Selection - Very important for targeting specific enemy body parts such as limbs or eyes. Different attack types can have different effects, such as the Ravager's charge tearing off hands, feet, arms, etc.. if they are targeted.
- Intent State Buttons - Safe (green/1), grab (yellow/3), and harm(red/4) function the same as they do in standard SS13 but disarm (blue/2) functions as harm!!!! Also remember that the default hotkey for grabbing is 'ctrl' + clicking on your target.
- Hunt/Stalk (Run/Walk) Toggle - Basic run/walk state for Xenomorphs. Hunt and stalk confer no other abilities or bonuses.
- Resist Button - An important button to remember when you're on fire! Press to stop, drop, and roll to extinguish the fire and repeat until the fire goes out.
- Right/Left Hand Selection - Selects your active hand. When you grab something, you can press this button (or press the default hotkey 'X') to switch to your free hand and perform tackles or slashes while you drag your target.
Tabs
Game Tab
- Operation Time - How long the current round has been going in hours and minutes. Note that the operation always starts at 12:00, so 12:05 means the round has been going for five minutes.
- Current Map - The current map being played.
- Evolution progress - Once this number reaches the current maximum, you may be able to evolve into a new caste of higher-tier Xenomorph. These slots are limited, so evolving may not be possible, or you may not want to evolve due to your own preference or the needs of the hive. Note that you can always evolve from a larva into a tier 1 caste.
- Upgrade progress - Once this number reaches the current maximum, your Xenomorph will upgrade to the next growth level. This is different from evolving into a new caste and simply improves the stats of your current caste, usually health, plasma, and damage for example. The growth levels in order are young, mature, elder, and ancient.
- Plasma - Shows your current level of plasma, used for abilities.
- Slashing of hosts is currently - This is an important rule to follow that the Queen can set to PERMITTED (ALLOWED), LIMITED (RESTRICTED-LESS DAMAGE), or FORBIDDEN. This rule usually reflects the hive's numbers and the state of the round. If the Xenomorphs are handily winning with lots of available larva, it will usually be set to PERMITTED allowing you to kill hosts instead of trying to capture them.
Alien Tab
- Crawl through vent - Clicking this will make your Xenomorph enter the nearest vent within one tile space. It takes five seconds, and only small types of Xenomorph can enter vents. To leave a vent, simply move to the end of a vent or pipe network and you will see a message that your Xenomorph is climbing out of the vent. This also takes a few seconds. Be careful that you don't accidentally exit a vent in a dangerous area.
- Evolve - How you evolve to another tier of Xenomorph when your evolution progress number is at maximum.
- Hive Status - Shows the number, type, location, and names (number designations) of all living Xenomorphs as well as larva and burrowed larva. It's important to pay attention to this to cooperate best with your hive.
- Toggle Middle/Shift Clicking - This is important and will change how your selected abilities activate. Shift-clicking means the ability activates when you hold shift and click on the target tile. Middle-mouse means you middle-mouse click on the target tile. You may want to make sure this is set to your preference after evolving to a new tier of Xenomorph.
- Toggle Xeno Status HUD - Turns the Xeno HUD overlay on the sprites in the game area on or off, showing each Xeno's health and plasma levels.
Xeno Status Icons
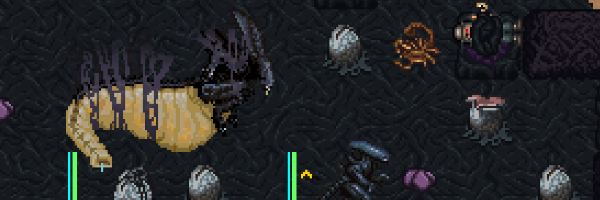
The image to the right shows which status icons can appear on your Xenomorph.
 Sunder - Indicates how much marines removed your armor on a percentage basis so if a xenomorph has 50% sunder, it has 50% less armor
 Upgrade Status - Chevrons indicating your current upgrade status (growth level.)
 Leader Status - Indicates if the Queen has made you a leader, directing other Xenos to follow your orders and direction.
 Queen Overwatch - Indicates if the Queen is using her sight to see through your vision.
- Effective Pheromones - Indicates which pheromones you're being affected by. The three types of pheromones are:
 Frenzy (increases damage,)
 Warding (increases armor)
 Recovery (increases healing.) Pheromones are emitted globally by the Queen and locally by other castes such as Praetorians.
Communication
Hivemind is the chat that all Xenomorphs can see, usable with :a or ;. You will occasionally get messages directly from the Queen as well as the results of her telepathic scan showing the number of living enemies remaining.
Step 3: Time to Evolve
Stay alive and safe until your evolution progress reaches 100. Ask your Queen and check the hive status if the hive needs you to evolve into something specific. If not, choose a tier 1 role, or if you have a desired role of a higher tier, choose towards that evolution path.
Read the Xenomorph Castes page for more information on each type of Xenomorph.
Tier 1 Xenomorph Overview
| Caste | Role | Difficulty |
|---|---|---|
 Drone |
Sustain the hive by creating defences and weeds, and planting eggs. Evolves from Larva; evolves into Carrier, Hivelord or Queen. | Intermediate |
 Defender |
Be a living shield. Evolves from Larva; evolves into Warrior. | Easy |
 Runner |
Harrass groups, and abduct or kill solitary Marines. Evolves from Larva; evolves into Hunter. | Hard |
 Sentinel |
Subdue threats with neurotoxin, and prevent hosts from escaping the hive. Evolves from Larva; evolves into Spitter. | Intermediate |
Xenomorph Evolution Diagram
Click on the xeno images to go to their respective page.
| Tier | |||||||||||||
|---|---|---|---|---|---|---|---|---|---|---|---|---|---|
| 0 |  |
 |
 |
 |
 |
 |
 |
 |
 |
 |

| ||
 |
 |
 |

| ||||||||||
| 1 |  |
 |
 |

| |||||||||
 |
 |
 |
 |
 |
 |
 |
 |
 |

| ||||
| 2 |  |
 |
 |
 |
 |
 |
 |
 |
 |

| |||
 |
 |
 |
 |
 |
 |
 |
 |
 |

| ||||
| 3 |  |
 |
 |
 |
 |
 |
 |
 |
 |
 |

| ||
| 4 |  |
 |

|
Roleplaying Guidelines
This is a MRP (medium role-play) server and we are not solely dedicated to Aliens lore. That said, the Xenomorphs themselves have some RP requirements. According to lore, they are a hive-mind that show considerable (and ultimately unknown) levels of intelligence. They are extra-terrestrial Parasitoids with a reproductive strategy centered around a queen as well as other morphological abilities depending on the circumstance.
- Playing a Xenomorph, you must understand your role and work together as a hive.
- Some roles have more autonomy than others, but a direct command from the queen should always be obeyed.
- As stated, Xenomorphs have an as-yet unknown level of intelligence. This not only allows for complex tactics to be used, but can lead to some fun RP opportunities if the situation permits.
- Refer to the rules if you have any other questions.
Step 4: Combat
Play Your Role!
Through play experience and reading this wiki, you'll learn the different hive castes and roles. Each role is a critical part of a victorious hive and it's important you understand your role, try and play it to the best of your ability, and cooperate. Teamwork is always the backbone of any victory! Here are some basics to get you started:
Melee
![]() Specialists: Runner, Hunter, Warrior, Ravager
Specialists: Runner, Hunter, Warrior, Ravager
![]() Secondary Defender, Crusher, Praetorian
Secondary Defender, Crusher, Praetorian
All Xenomorphs can melee, but some have special strengths in this area. This type of fighting requires good accuracy with the mouse, positioning with your keyboard, and a constant situational awareness so you don't get caught and killed. Most melee-focused Xenomorphs are glass cannons, and it's always smart to play them as such. It's also important you heed the Queen's orders of whether killing hosts is permitted or not.
The important aspects of melee are slashing (clicking on your target with harm/1 intent selected while adjacent,) tackling (using a pounce ability or the tackle/2 intent,) and dragging (using the grab/3 intent or ctrl+clicking on a target and pulling them.) You can also tackle or slash while you drag by switching hands and clicking on your captive.
The art of click-fu in the SS13 game engine is a complex topic all on it's own, but the best way to learn is to play, practice, and ask questions.
Ranged
![]() Specialists: Sentinel, Spitter, Boiler, Praetorian, Queen
Specialists: Sentinel, Spitter, Boiler, Praetorian, Queen
![]() Secondary Carrier
Secondary Carrier
Ranged attacks for the Xenomorphs include neurotoxic spit, acid spit, and acid spray. These attacks are somewhat simpler than melee in you simply shift/middle-click on your target unit or tile to fire your ranged ability. Neurotoxin produces stun-like effects which can build up over time to cause an overdose and down a marine, while acid causes immediate burns and is more dangerous with a potential to kill.
As a ranged Xenomorph, you are very important to support and assist your melee classes, act as constant harassment and damage, and in the case of the boiler, controlling key areas and breaking sieges.
Note - The Carrier is technically a ranged class since its main ability is throwing facehuggers (and it should be played with similar care) but its position and engagement are often different. The Carrier has a unique playstyle of its own that takes time to learn and master.
Support
![]() Specialists: Drone, Hivelord, Shrike
Specialists: Drone, Hivelord, Shrike
![]() Secondary Sentinel, Carrier, Crusher, Defiler
Secondary Sentinel, Carrier, Crusher, Defiler
The Drone and Hivelord are the primary support roles, meaning they construct and maintain the hive, eggs, hosts, and fortifications, tunnels, or other defenses at forward positions. Secondary supports can assist with these roles or provide special abilities to the Xenomorph team, such as the Crusher's ram and Defiler's smokescreen. These roles may not always provide the constant stimulation of combat, but they are absolutely vital, offering unique gameplay and rewarding creativity. Don't be afraid to try them out, but be sure to read more about the abilities of each.
Hive Mechanics
How the Hive Works
To ensure that xenomorphs can overwhelm marines, they need a good number of xenomorphs. However, they gain more xenomorphs by killing marines and recycling them in silos. For every 2.5 marines siloed, the hive gains a burrowed larva. Capturing marines is a choice but not as feasible as murderboning marines.
Killing and Siloing Marines
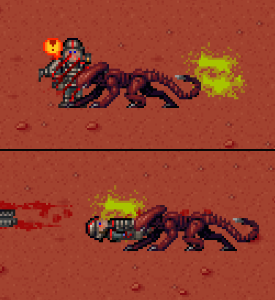
So you've slashed, tackled, spit, or otherwise killed yourself a marine, but you need to headbite ![]() the marine before you can recycle the marine. After you headbite the marine, you bring them back to a silo. You can do this by dragging them with ctrl + left mouse click or devouring them (grab them with grab intent/3, then click on your Xeno sprite and stand still.) Devouring allows you to move faster. To throw them up, use the regurgitate ability.
the marine before you can recycle the marine. After you headbite the marine, you bring them back to a silo. You can do this by dragging them with ctrl + left mouse click or devouring them (grab them with grab intent/3, then click on your Xeno sprite and stand still.) Devouring allows you to move faster. To throw them up, use the regurgitate ability. ![]() . To silo them, grab them and click on silo.
. To silo them, grab them and click on silo.
Important Combat Mechanics
Weeds
Weeds are the Xenomorph infestation that spreads along the ground and walls from purple sacs (planted weed nodes,) and they are a critically important aspect of the Xenomorph team. The Queen, Drone, Hivelord, and Defiler are the only classes that can plant weeds, adding further importance to these support roles.
Without weeds, a Xenomorph will not heal, and if wounded to critical, will bleed out and die unless dragged onto weeds. Plasma will regenerate off weeds, but at a very slow rate compared to on weeds. This makes weeds in a forward area absolutely vital to the success of any Xenomorph team, so make sure as a support caste you're constantly weeding on and around the front lines while keeping yourself safe.
Fire
Fire hurts, especially young Xenos and certain types. There are three types of fire: normal, blue flame (X-type fuel) and green flame (B-type fuel.) Blue flame burns hotter, doing more damage, and green flame disperses in a large arc from where it's fired but does less damage. If you catch fire, RUN to safety and try to run towards teammates and/or weeds if you can. Press resist to roll on the ground and put yourself out. You can put out others on fire by switching to help state (help/1) and clicking on their sprite.
Darkness
Darkness is your friend! Xenomorphs have perfect night vision that can be toggled on and off to see what's visible to marines. Use this darkness to your advantage—smash lights, melt flares, destroy power generators, and skulk just out of visual range until you strike. This is especially important for ranged classes which often have a maximum range that's outside of a marine's visual light radius. Keep in mind that marines have their own ability to see in the dark. Smartgunners, Specialists, and marines with certain weapons and equipment have nightvision that's just as powerful as yours, so always remain cautious even if you think you're safe in the dark.
One last important note about darkness—every map in TGMC is technically pitch black without a source of light. This means that if the power is out on the planet, everything will be black and the marines must bring their own light sources and/or repair the power. This is important information for new players to have so they can avoid winding up stuck in total darkness!
Vents
Under the Alien tab, there's an option that says 'crawl through vent.' Clicking this within one space of a vent tile will allow you to enter the vent after a short delay (4 seconds.) While in a vent, you can see the network of underground atmosphere pipes that run throughout the map. These pipes have their own unique layout in each map, and you'll have to learn them by exploration. You can't be seen or hurt while in a vent, but you do make noises and can be picked up by scanners.
Use vents to scout the map in safety, gain access to restricted areas, and ambush unsuspecting targets. Note that vents can also be welded shut by a marine with a welder, making them impassable. Xenomorphs can break these welds by using harm intent on the welded vent while outside the vent.
Conclusion
This ends the Xeno Quickstart guide. Armed with this knowledge, you should be well on your way to terrorizing and consuming all life in the known universe. Be sure to read each Xenomorphs' individual wiki page for a detailed explanation of their abilities and tactics, and be sure to have fun while you play and learn. TGMC can be a daunting, difficult, and sometimes frustrating game, but stick with it and you'll be rewarded with one of the most unique game experiences out there.


