|
|

|
This page is currently under construction!
The following page is currently in the process of being created, is undergoing a major structural rework and/or is being moved.
The reason for this is: "New page."
|
|
|

|
This page is a part of the TGMC wiki.
TGMC is a project based on the CM-SS13 codebase.
|
The FOB stands for Forward-Operating-Base, its main purpose is to deter xenos from tampering with the dropship shuttle console and locking it, followed by hijacking/capturing it to end the round with xeno victory.
In order to achieve this goal, the FOB needs to be built in a defensible manner as to be an effective force multiplier for the defenders to be able to effectively defend it with as little manpower as possible as the more marines on the FOB there is, the less there could have been around the map helping with nuclear disks or attacking the hive.
This is a basic guide to tips and tricks of building a FOB during combat operations.
This could mean the difference between Fort Knox that can last against a xeno attack for hours and a couch fort that crumbles at first contact.
Construction
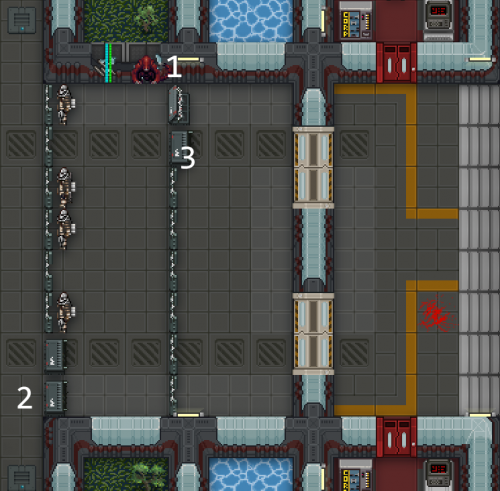
Example of a bad FOB layout:

Here are some of the things that are wrong with this layout:
1. There is a way to go around the barricades.
A line of barricade is only as strong as its weakest point, in this case the xenos can just go around and take the (slightly) longer way to circumvent the barricades.
2. Bad line of fire.
On point 2, a xeno can slash the barricade from the tile next to the vent and take cover behind the wall to avoid being shot.
3. Plasteel barricades not lined up.
These can cause issue by congesting foot traffic between marines defending the FOB which can be fatal in certain circumstances. But otherwise it's not as much of an offending issue.
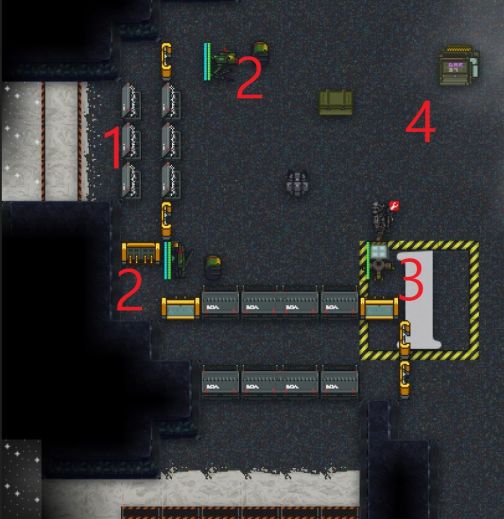
Example of a better FOB layout:

1. Good cade placement:
-Cades immediately next to each other: This allows the front layer to be repaired while still being under the cover of the second cade layer, this stops you from being attacked by projectiles mid-repairs. Although there are some downsides to this line of thought, the benefit is still worth considering.
Downsides include: More cades being covered by a single boiler gas glob (which doesn't do noteworthy damage on its own), more cades being damaged by an explosion (which is generally only caused by marine weaponry).
Benefits include: Being able to weld the frontmost layer from the second layer, being able to immediately replace a destroyed front layer cade by unanchoring a cade and moving it to the front, minimal amount of material needed compared to other layouts.
-Inward expansion: By expanding the defensive line inwards, in the event that the outer line of barricades were destroyed, the second layer would act as a chokepoint that allows for better line of fire.
-Strategic placement of plasteel barricade: The plasteel barricade is the strongest barricade structure available to marines, placing them in areas more likely to be attacked allows defenders to take advantage of its durability instead of placing it aside only to use it as a gate. In circumstances where you simply do not have enough plasteel, you can use either sandbags or metal barricades upgraded to the relevant type.
-Strategic placement and upgrade of metal barricade: The metal barricades has been upgraded to caustic in this case, as to make them more resistant to acid damage sources which comes from ranged xenomorphs as they've been placed in areas less vulnerable against slashes. The unupgraded metal barricade is otherwise the weakest type of fortification, as it has a low integrity. As such, it is recommended to upgrade them to either ballistic or caustic depending on whether they're in a spot that is vulnerable to slashes or to ranged spits.
2. Good sentry placement:
-Always set them to radial mode: This ensures that the sentry cannot be destroyed by a Wraith simply teleporting behind them. The shorter range you just have to swallow, as the alternative of letting it happen is worse. You can switch it back to normal mode if there's enough marines on the FOB defending it however.
-Away from Crusher lanes: Pay attention to the placement of the sentries, areas open for a Crusher to charge through (at least 7 tiles in a straight line) can spell its immediate destruction, though this can be avoided by simply placing them away from such areas as seen on the image.
-Close enough to cover cades from melee/vomits: What good is a sentry if it doesn't actually cover anything? Though you can't really cover the cades against acid spits as the ranged castes generally are able to outrange/attack the cades from an angle the sentry can't cover which is why it's essential to have actual marines defending the FOB still, even with sentries.
3. Light:
You can't shoot what you can't see, can you? Make sure to bring at least 3 floodlights or enough flares/flashlights to lighten up the FOB.
4: Supplies:
You should make a mental checklist on what supplies to bring to the FOB, generally these should include: ammo, medical supplies, engineering supplies, food, spare weapon/gear. Although this part can be mostly ignored if the FOB has a supply beacon to allow requisitions to send supplies to it, though it's more prudent to bring what you care about with you in the first place.
Defensive Structures
| Barricade
|
Integrity
|
Armour
|
Cost
|
Misc Information
|

Metal
|
200
|
30 Bullet, 30 Laser, 30 Energy, 80 Fire, 40 Acid
|
4 Metal
|
-Can be upgraded using 1 metal.
-Can have barbed wire attached.
-Only 5% less durable than the sandbag against bullet, laser, and energy damage thanks to its built-in armour.
|

Sandbags
|
300
|
80 Fire, 40 Acid
|
5 Filled Sandbags
|
-Requires no engineering skill to build quickly.
-Has 50% more integrity than metal barricade.
-Repairable with filled sandbags.
-Can have barbed wire attached.
|

Plasteel
|
500
|
80 Fire, 40 Acid
|
5 Plasteel
|
-Can be opened and closed by clicking it with an empty hand.
-Can be linked to other plasteel cades by clicking it with a crowbar, linked plasteel cades can be opened simultaneously.
-Can have barbed wire attached.
-Has 150% more integrity than metal barricade.
-Has 66% more durability against acid damage than a caustic metal barricade.
-Has 75% more durability than ballistic metal barricade against melee damage.
-Has 25% more durability than concussive metal barricade against bomb damage.
|

Razorwire
|
100
|
No armour
|
4 Metal for 2 spools.
Can also be made with 8 metal rods and 2 barbed wire for 2 spools.
|
-Not to be confused
with barbed wire.
-Damages xenos if slashed.
-Cannot be pounced or climbed through.
-Can entangle crushers and queen if they charge into it. Though just as likely to be destroyed from the charge
-Can be electrified by placing cables connected to a powered APC terminal underneath.
-Has 1/3rd the durability of unupgraded metal barricade against acid and bullet/laser/energy damage.
|

TL-182 Deployable Shield
|
300
|
35 Melee, 30 Bullet, 20 Laser, 40 Energy, 25 Bomb, 30 Acid
|
30 Requisition Points
OR
3 points in the
Engineer's Equipment
Rack
|
-Can be placed/removed without needing any skills by ctrl+clicking a tile adjacent to you/click-dragging the barricade into your sprite.
-A normal-sized item and can be stored on satchels and other containers.
-Can have barbed wire attached.
-Has 50% more integrity than metal barricade.
-Has 60% more durability against melee damage than ballistic metal barricade, 130% more than an unupgraded one.
-Has 18% less durability against acid damage than caustic metal barricade, but 30% more than an unupgraded one.
-Has the same durability against bomb damage as concussive metal barricade.
-Repaired with metal sheets if under 20% integrity.
|

Wooden Barricade
|
100
|
No armour
|
5 Wood
|
-Cannot have barbed wire attached.
-Has 50% less integrity than metal barricade.
-Cannot be repaired.
|
Barricade Upgrades
These can be applied on metal cades by clicking on them with metal sheets.
Except for the barbed wire which need to be made with metal sheets and can be used on any cades except for razorwire and wood.
| Type
|
Armour
|
Cost
|
Misc Information
|
 Concussive Concussive
|
50 Bomb
|
1 Metal
|
-Effectively doubles the barricade's durability against explosions.
|
 Ballistic Ballistic
|
30 Melee, 30 Bullet,
30 Laser, 30 Energy
|
1 Metal
|
-Lessens the damage of the Crusher's charge (melee damage), and Warlock's psychic blast (energy damage).
-Effectively increases the barricade's durability by 45% against melee damage.
-Effectively increases the barricade's durability by 75% against bullets, laser, energy without taking account of AP values.
|
 Caustic Caustic
|
20 Acid
|
1 Metal
|
-Immunity from acid vomit melting the barricade.
-Effectively increases the barricade's durability by 50% against acid damage.
|

Barbed Wire
|
+50
Max Integrity
|
2 Metal
|
-Damages xenos if slashed.
-Prevents xenos from pouncing over the barricade, also blocks climbing through, remove with wirecutters.
|
Repairing Cades
Metal and plasteel can be repaired with a welder for 40 integrity per weld, unless they are under 20% integrity in which case they'll need 2 sheets of metal/plasteel to be brought back to a weldable integrity.
Sandbags can be repaired with filled sandbags for 20% integrity per bag.
Razorwire can be repaired with metal sheets for 20% integrity per sheet.
Walls can be repaired with a welder for 85 integrity per weld.
Deconstruction
Unless the barricade is at full health, you won't get all your materials back. Make sure it's repaired with a welder first if possible.
Dismantling an barricade that has been vomited with acid will return some of the materials instead of it disappearing completely, though you have to remove the barbed wire with wirecutters for vomited barricades, as they do not appear if the barricade is dismantled.
You can dismantle multiple cades simultaneously.
Metal & Plasteel Barricades:
 Screwdriver and wrench
  the barricade, to put the barricade in movable state, use a wrench to lock it back in place. However, the cade's own facing will block its own movement, you can get around this by moving it in a zig-zag pattern.
 Use a crowbar to dismantle the barricade while it is in movable state.
Sandbags
Use a shovel or unfolded entrenching tool and click on the sandbag barricade, do NOT be on harm intent as you will attack the barricade and damage it instead, resulting in less sandbags recovered.
Razorwire
 Use a wirecutter on it Note: deconstructing razorwire only yields 4 metal rods and one barbed wire back assuming it is at full integrity
Emplacements
These can be deployed by ctrl+clicking a tile next to you with them as an item in active hand.
To undeploy, click-drag the sprite of the emplacements into yourself while standing next to them.
To repair, use an active blowtorch to weld.
| Emplacement
|
Information
|
How to use
|
Damage
|
 UA-571-C Sentry Gun UA-571-C Sentry Gun
|
A deployable, slow firing, automated sentry with 500 rounds.
Has 3 fire modes Automatic, Auto-Burst and Burst Fire.
Fires in 4 round bursts.
Radial reduces range instead by 2
Takes 6 seconds to deploy. 6 seconds to pick up.
Manual Override allows you to control it, has a built in miniscope.
Can be reloaded while in hand.
200 Health and 50 Armour.
Built-in IFF System
|
Control click to deploy.
Drag click to you to pick up.
Alt click to remove mag only if deployed otherwise regular click if in hand.
Can be repaired with a welder.
Can be shot over.
|
25 damage
20 AP
0 Sunder
0.25 Automatic Rate of Fire
0.6 Burst Rate of Fire
8 Range
|
 UA-580 Point Defence Sentry UA-580 Point Defence Sentry
|
A deployable, fast firing, automated sentry with 300 rounds.
Has 3 fire mods Automatic, Auto-Burst and Burst Fire.
Fires in 3 round bursts.
Radial reduces range by 2
Takes 3 seconds to deploy. 3 seconds to pick up.
Manual Override allows you to control it.
Can be reloaded while in hand.
200 Health and 50 Armour.
Built-in IFF System
|
Control click to deploy.
Drag click to you to pick up.
Alt click to remove mag only if deployed otherwise regular click if in hand.
Can be repaired with a welder.
Can be shot over.
|
20 damage
20 AP
0 Sunder
0.2 Auto Rate of Fire
0.4 Burst Rate of Fire
7 Range
|
 TL102 Heavy Smart Gun TL102 Heavy Smart Gun
|
A deployable. fast firing, HSG with 300 rounds.
Has 2 fire mods Automatic and Burst Fire.
Fires in 3 round bursts.
Has a mini scope.
Can be turned around by clicking on any tile directly to the left or right of it.
Takes 5 seconds to deploy. 5 seconds to pick up
Can be reloaded while in hand.
125 Health and 50 Bullet Armour.
Built-in IFF System
|
Control click to deploy.
Drag click to you to pick up.
Alt click to remove mag only if deployed otherwise regular click if in hand.
Can be repaired with a welder.
Can be shot over.
|
40 damage
40 AP
5 Sunder
0.25 Auto Rate of Fire
0.2 Burst Rate of Fire
|
 T-27 Medium Machinegun T-27 Medium Machinegun
|
A deployable, faster firing, MMG with 100 rounds.
Has only 1 fire mode Automatic.
Can accept attachments.
Can also be fired from the hand with heavy recoil.
Can be turned around by clicking on any tile directly to the left or right of it.
Takes 1 second to deploy. 1 second to pick up.
Can be reloaded while in hand.
200 Health and 50 Bullet Armour.
Only has IFF with Aim Mode.
|
Control click to deploy.
Drag click to you to pick up.
Alt click to remove mag only if deployed otherwise regular click if in hand.
Can be repaired with a welder.
Can be shot over.
|
30 Damage
10 AP
1.25 Sunder
0.15 Rate of Fire
0.25 Aim Mode Rate of Fire
|
 MG-08/495 Heavy Machinegun MG-08/495 Heavy Machinegun
|
A deployable fast firing, HMG with 500 rounds.
Has only 1 fire mode Automatic.
Has a mini scope.
Can be turned around by clicking on any tile directly to the left or right of it.
Takes 8 seconds to deploy. 8 seconds to pick up .
Can be reloaded while in hand.
150 Health and 50 Bullet Armour.
Has no IFF be very careful.
|
Control click to deploy.
Drag click to you to pick up.
Alt click to remove mag only if deployed otherwise regular click if in hand.
Can be repaired with a welder.
Can be shot over.
|
40 damage
40 AP
5 Sunder
0.2 Auto Rate of Fire
|
 Build-A-Sentry Attachment System Build-A-Sentry Attachment System
|
An rail attachment that when attached to an applicable gun can be placed like a sentry with the function of the gun attached to.
250 Health.
Will not have IFF unless the gun has IFF built in like the T29 Smart gun.
|
Control click to deploy.
Drag click to you to pick up.
Alt click to remove mag only if deployed otherwise regular click if in hand.
Can be repaired with a welder.
Can be shot over.
|
Dependant on the gun it is attached to
|

Deployable Floodlight
|
A powerful portable light source.
200 health.
Shines in a 15x15 tile radius.
|
Control click to deploy.
Drag click to undeploy.
Click with an empty hand to toggle.
Can be repaired with a welder.
Can be shot over.
|
Making dark areas bright.
|
 M402 Mortar M402 Mortar
|
A deployable mortar capable of firing 5 types of mortar shells.
200 Health.
Takes 5 seconds to deploy the mortar. 5 seconds to pick up the mortar.
Takes 2 seconds to fire. 9 seconds for shells to land.
Does not have a skill requirement to use.
|
Control click the mortar while in hand to deploy.
Wrench to pick up.
Is inaccurate depending on how far away the target is. Every 10 tiles travelled is 1 tile inaccuracy which can be countered using the mortar Longitude and Latitude offset.
Can be repaired with a welder.
Can not be shot over.
|
High Explosive shells
Incendiary shells
Tangle shells
Flare shells
Smoke shells
|
 ASRS Bluespace Teleporter Pad ASRS Bluespace Teleporter Pad
|
A Teleporter pad Capable of teleporting Marines, Crates and Machinery.
200 Health. Can not be shot at or slashed only melted.
Takes 2 seconds to deploy. 2 seconds to pick up.
Needs either a powered APC to function or an inserted powercell.
|
Control click the teleporter while in hand to deploy.
Wrench to pick up.
Needs power to function.
Can insert powercells to power it.
Crowbar to remove power cell
Can be repaired with a welder.
|
Logistics
|

 Screwdriver and wrench
  the barricade, to put the barricade in movable state, use a wrench to lock it back in place. However, the cade's own facing will block its own movement, you can get around this by moving it in a zig-zag pattern.
 Use a crowbar to dismantle the barricade while it is in movable state.
 Use a wirecutter on it Note: deconstructing razorwire only yields 4 metal rods and one barbed wire back assuming it is at full integrity


