Difference between revisions of "User:Karkinos"
| Line 21: | Line 21: | ||
*1. Are your standard, basic character options. Choose a name according to our naming policy (Rule 3 precedents) and how you want to look. | *1. Are your standard, basic character options. Choose a name according to our naming policy (Rule 3 precedents) and how you want to look. | ||
| − | *2. These are your preferences for other roles. If you want to play marine, turn these options to No. Survivor is a very challenging role and you can always become a Xenomorph later after you die, using the Join As Larva option. See the [[TGMC:Xeno_Quickstart_Guide]] for more info on that. | + | *2. These are your preferences for other roles. If you want to play marine, turn these options to No. Survivor is a very challenging role and you can always become a Xenomorph later after you die, using the Join As Larva option. See the [[TGMC:Xeno_Quickstart_Guide|Xeno Quickstart Guide]] for more info on that. |
[[File:TGMC_Marine_setup_2.png|500px]] | [[File:TGMC_Marine_setup_2.png|500px]] | ||
| Line 32: | Line 32: | ||
=Step 2: Man, this floor is freezing!= | =Step 2: Man, this floor is freezing!= | ||
| + | |||
| + | [[File:TGMC_Cryo_wakeup.png]]<br> | ||
| + | <br> | ||
You've just woken from cryo, probably alongside your teammates. What are you waiting for, breakfast in bed?! You will be almost naked, hungry and most likely confused, but don't worry, baldie—the engineers counted on that when designing the ship. | You've just woken from cryo, probably alongside your teammates. What are you waiting for, breakfast in bed?! You will be almost naked, hungry and most likely confused, but don't worry, baldie—the engineers counted on that when designing the ship. | ||
| − | First, find the important message in your chat box to the right | + | First, find the important message in your chat box to the right. This is your '''squad assignment''', role, and who your direct superior is in the chain-of-command. Unless you picked a preferred squad in your preferences, you'll be assigned randomly. As you can see, there are four colored lines to guide you. In this example, we've been assigned to Delta squad. That means we follow the blue line down. Your squad color is indicated by the squad name's text in the squad assignment message: red for Alpha squad, yellow for Bravo, purple for Charlie, and blue for Delta. |
| − | + | ||
| − | This is your squad assignment, role, and who your direct superior is in the chain-of-command. Unless you picked a preferred squad in your preferences, you'll be assigned randomly. | + | Follow your squad's line up or down to the canteen for some breakfast, recruit, because hungry marines move slower. There are two canteens on the port and starboard sides of the ship. Walk up to one of the vendors and dispense your preferred dish. Pick it up by clicking on it, then click on yourself to take a bite.<br> |
| + | [[File:]] | ||
| + | <br> | ||
| + | Your hunger is indicated by this little icon to your right: [[File:DMCA Hunger.png]] It has four stages in total, from almost starving to full: Orange, Yellow, None, Grey. | ||
| + | <br> | ||
| + | It might take several of these to fill you up as you've been in cryosleep for a good while, but shovel it down, recruit! We haven't got all day! | ||
| + | |||
| + | ==Gearing Up== | ||
| + | After you've had your chow, follow your squad's colored line on the floor and hustle to your squad preparations room. Each squad has their own. Inside, you'll see Squad Marine lockers on one side of the aisle, and separate rooms for specific roles on the other. Walk up to one of the Squad Marine locker areas. | ||
| + | |||
| + | [[File:TGMC_Squad_prep.png]] | ||
| + | |||
| + | [[File:TGMC_Marine_Vendor.png]]The '''GHMME Automated Closet''' will dispense your standard issue uniform, armor, belts, pouches, accessories and masks, and weapon attachments. | ||
| + | |||
| + | For your first deployment, dispense the items marked in white, the standard-issue kit. For a squad marine, that's only the uniform, but you'll need more gear before you're ready to drop. The recommended choices for armor, pouches, and attachments are marked in orange will serve you just fine for your first drop and hopefully bring your rookie ass home alive. | ||
| + | |||
| + | After dispensing it, pick up each piece and either press the default equip hotkey 'E' to equip it to the correct slot, or click on the correct slot while it's in your hand. Good grief, recruit, here's some advice: your uniform has to be on before you put your armor on, and the webbing attaches onto your uniform. Your webbing, armor, and helmet all have their own small storage slots, and you can store things like weapons on your suit storage (beside your feet slot) or on your back slot. The attachments obviously go on your weapon, so just put them in your satchel or on the ground for now. You reading this, baldie? | ||
| − | + | [[File:TGMC_Weapons_Rack.png]]The Automated Weapons Rack opposite the closet supplies the most important and beloved equipment: your firepower. Open it up and be both intimidated and aroused by the long list of state-of-the-art weaponry the Corps has graciously provided you. | |
| − | |||
| − | |||
| − | |||
Revision as of 01:10, 12 September 2019
Super noob to editing wiki's, but a big fan of SS13 and the CM game mode, and a lifelong Alien/Predator universe fan. Artist, writer, and sci-fi nerd of high caliber.
Sandbox area below
Step 1: How to be the Ultimate Badass
Welcome to Basic Training, Marine! Fall in!
You've decided to become the hero the corps needs! Good choice, but do you have what it takes?! This quickstart guide should get you started in no time, but first, you need to read the TGMC:Rules.
We are an MRP (medium role-play) server, meaning that you're expected to acknowledge the roleplaying nature of the game, follow the rules, and at least try and behave like a marine. You don't have to go writing love letters to your sweetheart back home or crying to the psych about your PTSD, but just avoid low-RP shenanigans and excessive memes. While our rules are pretty lenient, that doesn't mean your actions won't have IC (In Character) consequences. Stealing or refusing to listen to orders is against TGMC:Marine Law and will get the Military Police after you, or maybe a friendly stomping by your fellow marines!
If this is your very first time playing Space Station 13, you'll definitely want to read some starter guides and may want to play a few rounds on a standard SS13 game mode server before jumping in here.
Setting Up
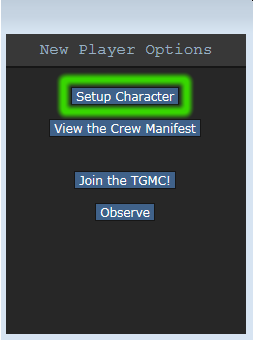
Hold up, recruit! Before you jump into the action, we recommend that you set up your character. Choose 'Setup Character' from the New Player Options tab.
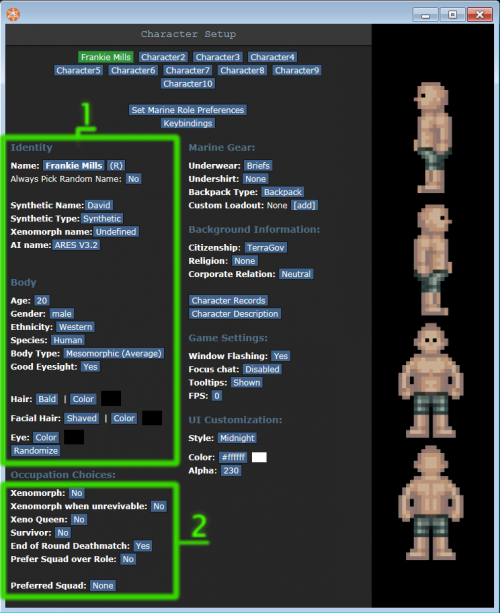
- 1. Are your standard, basic character options. Choose a name according to our naming policy (Rule 3 precedents) and how you want to look.
- 2. These are your preferences for other roles. If you want to play marine, turn these options to No. Survivor is a very challenging role and you can always become a Xenomorph later after you die, using the Join As Larva option. See the Xeno Quickstart Guide for more info on that.
You may also take a look at the marine role preferences list, but if this is your first game we recommend that you go as the standard TGMC:Squad Marine. They are t:the necessary backbone of any military operation and thanks to our modified skill system, also extremely versatile.
When you're done, either click the ready button or click Join TGMC if the round has already started and pick 'squad marine' from the bottom of the list.
2. Wake-up, prep, and basics (HUD)
Step 2: Man, this floor is freezing!

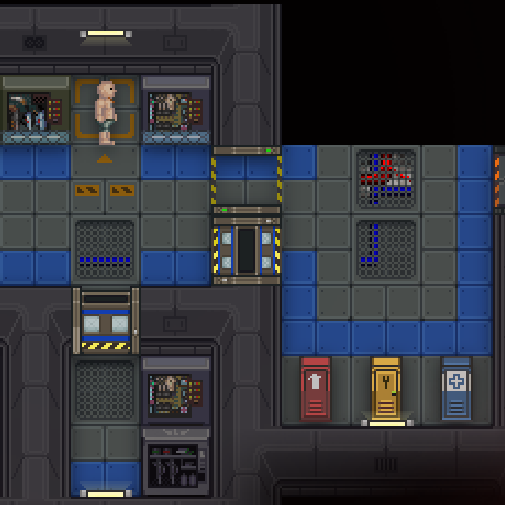
You've just woken from cryo, probably alongside your teammates. What are you waiting for, breakfast in bed?! You will be almost naked, hungry and most likely confused, but don't worry, baldie—the engineers counted on that when designing the ship.
First, find the important message in your chat box to the right. This is your squad assignment, role, and who your direct superior is in the chain-of-command. Unless you picked a preferred squad in your preferences, you'll be assigned randomly. As you can see, there are four colored lines to guide you. In this example, we've been assigned to Delta squad. That means we follow the blue line down. Your squad color is indicated by the squad name's text in the squad assignment message: red for Alpha squad, yellow for Bravo, purple for Charlie, and blue for Delta.
Follow your squad's line up or down to the canteen for some breakfast, recruit, because hungry marines move slower. There are two canteens on the port and starboard sides of the ship. Walk up to one of the vendors and dispense your preferred dish. Pick it up by clicking on it, then click on yourself to take a bite.
[[File:]]
Your hunger is indicated by this little icon to your right: ![]() It has four stages in total, from almost starving to full: Orange, Yellow, None, Grey.
It has four stages in total, from almost starving to full: Orange, Yellow, None, Grey.
It might take several of these to fill you up as you've been in cryosleep for a good while, but shovel it down, recruit! We haven't got all day!
Gearing Up
After you've had your chow, follow your squad's colored line on the floor and hustle to your squad preparations room. Each squad has their own. Inside, you'll see Squad Marine lockers on one side of the aisle, and separate rooms for specific roles on the other. Walk up to one of the Squad Marine locker areas.
![]() The GHMME Automated Closet will dispense your standard issue uniform, armor, belts, pouches, accessories and masks, and weapon attachments.
The GHMME Automated Closet will dispense your standard issue uniform, armor, belts, pouches, accessories and masks, and weapon attachments.
For your first deployment, dispense the items marked in white, the standard-issue kit. For a squad marine, that's only the uniform, but you'll need more gear before you're ready to drop. The recommended choices for armor, pouches, and attachments are marked in orange will serve you just fine for your first drop and hopefully bring your rookie ass home alive.
After dispensing it, pick up each piece and either press the default equip hotkey 'E' to equip it to the correct slot, or click on the correct slot while it's in your hand. Good grief, recruit, here's some advice: your uniform has to be on before you put your armor on, and the webbing attaches onto your uniform. Your webbing, armor, and helmet all have their own small storage slots, and you can store things like weapons on your suit storage (beside your feet slot) or on your back slot. The attachments obviously go on your weapon, so just put them in your satchel or on the ground for now. You reading this, baldie?
File:TGMC Weapons Rack.pngThe Automated Weapons Rack opposite the closet supplies the most important and beloved equipment: your firepower. Open it up and be both intimidated and aroused by the long list of state-of-the-art weaponry the Corps has graciously provided you.


