Difference between revisions of "TGMC:Marine Quickstart Guide"
| Line 54: | Line 54: | ||
=== Getting your Weapon === | === Getting your Weapon === | ||
| + | <blockquote> | ||
| + | <b><big>NOTE:</big> all weaponry is balanced to be 'viable', with difference coming in the form of playstyle each reaquire, such as shotguns CQC or marksman rifles range. | ||
| + | <br>Experiment and try different builds, aim to have fun and enjoy the game. | ||
| + | <br>You will never be a deadweight for your team.</b> | ||
| + | </blockquote> | ||
| − | |||
| − | ; Step 1 : Dispense one T-12 Assault rifle [[file:T12AR.png| | + | Across from your uniform vendor, inside your cubicle, there should be a weapons vendor. [[file:TGMC_fix.png|64px]] You may notice there's quite a large variety. |
| + | <br>Here's an example of one of them. | ||
| + | |||
| + | ; Step 1 : Dispense one T-12 Assault rifle [[file:T12AR.png|64px]] and pick it up. | ||
; Step 2 : Dispense six T-12 magazines [[File:T12AR_mag.png|64px]]. | ; Step 2 : Dispense six T-12 magazines [[File:T12AR_mag.png|64px]]. | ||
| Line 63: | Line 70: | ||
; Step 3 : Pick one up with your other hand, then click on your rifle to load it. Your T-12 will be empty, so you must load it. | ; Step 3 : Pick one up with your other hand, then click on your rifle to load it. Your T-12 will be empty, so you must load it. | ||
| − | ; Step 4 : Click the toggle firemode button in the top- | + | ; Step 4 : Click the toggle firemode button in the top-left of your screen to switch the rifle firing mode until you switch the rifle to automatic firing mode, which allows you to hold down your mouse to fire. |
| + | |||
; Step 5 : After that, equip your rifle with '''E''' or click on your suit storage slot. Put the rest of your magazines into your ammo belt. [[file:TGMC_Ammo_Rig.png|64px]] | ; Step 5 : After that, equip your rifle with '''E''' or click on your suit storage slot. Put the rest of your magazines into your ammo belt. [[file:TGMC_Ammo_Rig.png|64px]] | ||
| − | Now is the time for adding attachments onto your gun. The | + | Now is the time for adding attachments onto your gun. |
| + | <br> To check what attachments your weapon can support, inpect it (Shift+click on the item) and the click on the link in 'The codex has relevant information' to open the codex and see the full list of attachments available, as well as any stats for your weapon. Some weapry come with attachments that cannot be removed, such as the stock on the T12. | ||
| + | <br>Attaching something is the same as reloading your rifle: Rifle in one hand, attachment in the other, click the rifle with the attachment. After you're done, you might also want to grab a few flare packs and put them into your satchel. | ||
| + | <br>Flares serve an important role, giving you intel and may prevent you from walking into an ambush. Always flare a room first before pushing into it with your squad. You may notice a requisitions area, which is where you can get more advanced gear such as grenades. Since your basic setup is complete for now, you can ignore this area. | ||
[[File:DMCA_Weapons_Vendor.png|400px]][[File:DMCA_Equipped2.png|400px]] | [[File:DMCA_Weapons_Vendor.png|400px]][[File:DMCA_Equipped2.png|400px]] | ||
Revision as of 11:54, 2 January 2021

|
This page is a part of the TGMC wiki.
TGMC is a project based on the CM-SS13 codebase. |
Welcome!
You've decided to become the hero the corps need, good choice! This quickstart guide should get you started in no time. But as with any server, it's important you get yourself familiar with the Rules first. We are a Medium Roleplay server, meaning that you should at least try and behave like a marine. That doesn't mean you have to go full "Yes sir", just avoid Low RP shenanigans and excessive memes. While our rules are pretty lenient, that doesn't mean your actions won't have IC (In Character) consequences. Stealing or refusing to listen to orders is against the Marine Law and might get the Military Police after you.
Waking up from Cryosleep
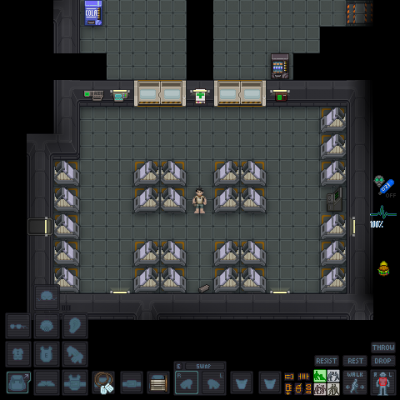
After finishing character creation you should find youself in cryosleep.
| Your Squad Leader says: "WAKE THE FUCK UP, PRIVATE! WE HAVE A HIVE WITH XENOMORPHS TO BURN!" |
Oh, so you're finally awake? You will be almost naked, hungry and most likely confused, but worry not, the engineers counted on that when designing the ship.
Unless you picked a preferred squad in your preferences, you will be assigned randomly. Take a look at the chat panel to your right, your squad assignment along with the flavor text should be there. Worry not if you didn't get into the squad you wanted, you will be doing as much shooting as any other rifleman (unlike some other servers).
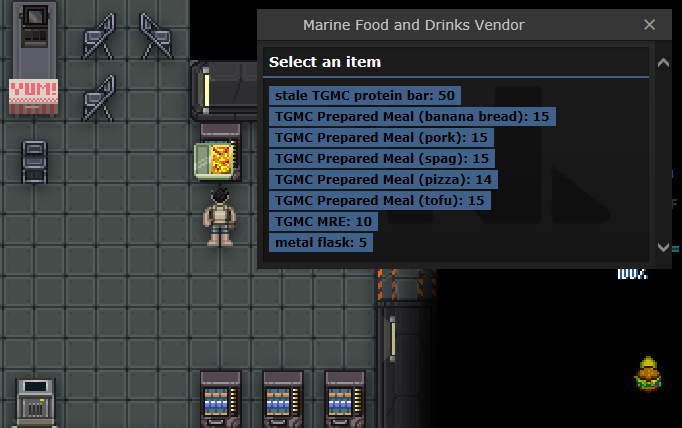
As you can see, there are four colored lines to guide you, although some ship maps have the prep area directly attached to the cryo bay. In this example, we've been assigned to the bravo squad. That means we follow the yellow line north, should there be one present. It's important to make a stop at the canteen for some breakfast, because hungry marines move slower. Stop by one of the food vendors, click on it and dispense your preferred dish. Pick it up by clicking on it, then click on yourself to take a bite. It might take several of these to fill you up, you've been in cryosleep for a good while. A good rule of thumb is that one prepared meal will add one "level" of food.
Your hunger is indicated by this little icon to your right: ![]() It has four stages in total, from almost starving to full: Orange (Starving), Yellow (Hungry), None (Full), Grey (Overweight).
It has four stages in total, from almost starving to full: Orange (Starving), Yellow (Hungry), None (Full), Grey (Overweight).
Since we have multiple ships with different layouts, you may find yourself lost or confused. Worry not!
Found in the top right corner of the game's window,
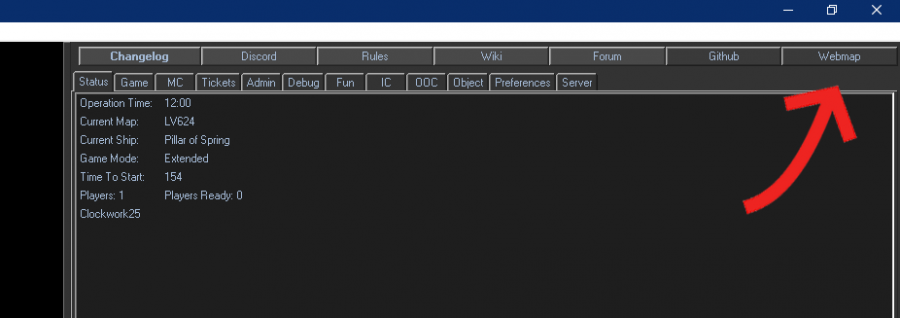
the Webmap button once pressed will present you with the chance to have an interactive map of either the ship or the planetside. A window will open up in your browser, where you'll be able to zoom in/out and move the map of your choice.
Gearing up
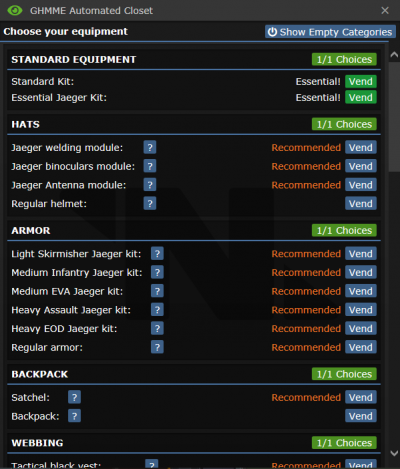
After you had your chow, head into your squad preparations room and enter one of the cubicles. Use the GHMME Automated Closet by clicking on it. There are also separate rooms for other squad roles. Dispense everything that is marked white, those are the mandatory items. For a squad marine, that means either standard or jaeger kit/undersuit.
Getting your Uniform and Armor
After dispensing it, click on each piece and either hit E to equip it to the correct slot or click on the correct slots in the bottom left yourself.
Skip the hats section unless you are wishing to go with Regular armor, and direct you attention to the ARMOR section.
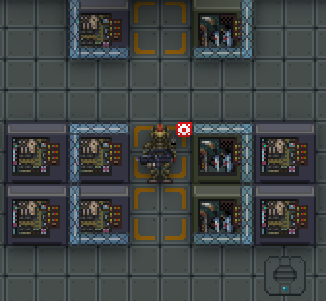
You may notice there's also a lot more choices for the rest of your equipment. If you are just starting out, the recommended things shown in orange work out just fine. There are some things to note though. The webbing or the vest go onto your uniform. Click on the uniform with it in your hand to attach it, you may then click on your uniform to access the storage space provided there. The attachments go onto your gun, which we will get in the next step. Keep them in your satchel for now.
Getting your Weapon
NOTE: all weaponry is balanced to be 'viable', with difference coming in the form of playstyle each reaquire, such as shotguns CQC or marksman rifles range.
Experiment and try different builds, aim to have fun and enjoy the game.
You will never be a deadweight for your team.
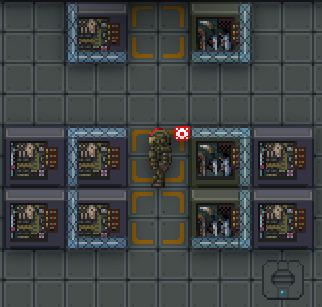
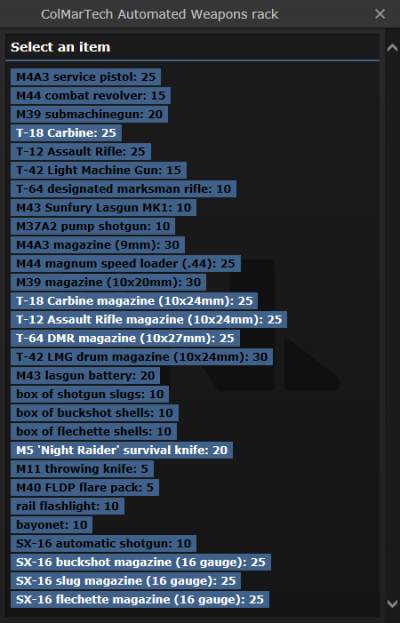
Across from your uniform vendor, inside your cubicle, there should be a weapons vendor.  You may notice there's quite a large variety.
Here's an example of one of them.
- Step 3
- Pick one up with your other hand, then click on your rifle to load it. Your T-12 will be empty, so you must load it.
- Step 4
- Click the toggle firemode button in the top-left of your screen to switch the rifle firing mode until you switch the rifle to automatic firing mode, which allows you to hold down your mouse to fire.
- Step 5
- After that, equip your rifle with E or click on your suit storage slot. Put the rest of your magazines into your ammo belt.

Now is the time for adding attachments onto your gun.
To check what attachments your weapon can support, inpect it (Shift+click on the item) and the click on the link in 'The codex has relevant information' to open the codex and see the full list of attachments available, as well as any stats for your weapon. Some weapry come with attachments that cannot be removed, such as the stock on the T12.
Attaching something is the same as reloading your rifle: Rifle in one hand, attachment in the other, click the rifle with the attachment. After you're done, you might also want to grab a few flare packs and put them into your satchel.
Flares serve an important role, giving you intel and may prevent you from walking into an ambush. Always flare a room first before pushing into it with your squad. You may notice a requisitions area, which is where you can get more advanced gear such as grenades. Since your basic setup is complete for now, you can ignore this area.
Heading to Planetside
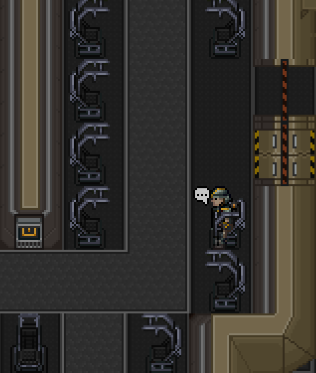
After this, you are almost ready to rumble! Briefing is nearly always held over radio, as it is more time efficient than making people stand around. They are usually announced around 12:05-12:10, but should you miss them ask your squadmates (;) or on the general channerl (:h). You should head through the briefing area and into the hangar, which is usually found west of briefing, if you're unfamiliar with the ship's layout use the webmap button at the top right, and click 'Ship' to access the online map. There will a beige dropship, the Alamo. Board the ship, find a seat and buckle in. The PO or a squad leader should launch once most people are inside. The flight shouldn't take long, you may use this time to talk with your squad and other marines. Press T and use ; to talk on your squad channel and :h or .h to talk on the general channel that everyone has access to.
Battle
When there's an enemy nearby or you hear shots or other signs of potential hostile activity, take your rifle out of your armor slot by either clicking on the sprite or pressing E. When you want to shoot, always make sure to wield it by hitting Z with it in your active hand, then click somewhere to shoot. Never fire a weapon one-handed as it causes a lot of recoil; you can tell when the screen shakes a lot. Always stay near your allies so that they may help you out when you get in a pinch.
If your rifle is out of ammo and you have an ammo belt full of fresh magazine
- Step 1
- press Z to unwield your rifle since you need an empty hand to get your new magazine
- Step 2
- press X to change the active hand from your rifle hand to your empty hand
- Step 3
- press E to instantly get your new magazine from your ammo belt
- Step 4
- click the sprite of your rifle with the magazine on your hand
- Step 5
- press X to change the active hand from your empty hand to your rifle hand
- Step 6
- press Z to wield your rifle.

|
Genetic FC says: "Whew! That was fun reloading your gun under heavy fire!" |
Firing lanes
It is very important to move in one line with your fellow marines and fire in a way where you won't hit your squadmates. It is better to miss a shot than to hit a friendly marine. Medics are a rarity, always let the people in the front shoot, don't try and move through them. Staying on grab intent ![]() (the yellow intent, hit 3 to use it) during a firefight is vital otherwise if you walk into someone who is also shooting with help intent
(the yellow intent, hit 3 to use it) during a firefight is vital otherwise if you walk into someone who is also shooting with help intent ![]() , meaning that both of you are in help intent, you will swap positions and get hit.
, meaning that both of you are in help intent, you will swap positions and get hit.
Stamina
You may have noticed that you have been walking this time.
If you hold down Alt, you will begin to run. If you press 5, you change your movement intent, meaning that you don't need to hold down Alt while running.
Running makes you move faster at the expense of some stamina and melee accuracy (but you shouldn't be in melee as a Standard Marine anyway). Some attacks also do stamina damage, and if it reaches a sufficiently low level you get knocked over. Your current stamina can be seen by this lightning bolt ![]() . When it is emptied, it will look like this
. When it is emptied, it will look like this ![]() and shortly becoming a lightning bolt that is darker blue, with a 100% text, indicating your fatigue. Taking further stamina damage will turn the lightning bolt orange and then red when completely empty. You will have to wait to recover from fatigue before your stamina portion starts regenerating.
and shortly becoming a lightning bolt that is darker blue, with a 100% text, indicating your fatigue. Taking further stamina damage will turn the lightning bolt orange and then red when completely empty. You will have to wait to recover from fatigue before your stamina portion starts regenerating.
Light
You may have noticed there's a button in the upper left of your screen. Click it to turn your armor light on. It is vital to keep the light on at all times, so you can see the environment and marines can see you. It is easy to get spooked by a marine in the dark and accidents may happen.
Keep in mind that every time your armor gets taken off, either by you or by a medic reviving you, the light is turned off and has to be turned back on manually.
Overcoming obstacles
If there's a wooden barricade, use your knife to destroy it. If it's a plasteel one, click on it with an empty hand to flip it open, walk through and flip it closed. It is vital that you always close the barricade after you move through it to prevent enemies from easily passing it.
If you see a table or a window frame, drag your character's sprite onto the obstacle or ctrl+click on the obstacle with an empty hand. This should allow you to climb through after a short animation.
Question?
If you are lost or have a question, feel free to use the MentorPM under the admins tab in the top right to ask experienced players a question. They'll be happy to help! Alternatively you can also use OOC or LOOC chats to ask about something, although you should keep in mind to not give away information about the current ongoing round.
I wanna be more Important!
Woah there cowboy! If you want to try a different marine role you can try the Smartgunner for extra firepower, or you could alternatively try out the Ship Technician as a non-combat shipside role.
| TGMC Roles 
| ||
| TerraGov Marines | Command | Captain, Field Commander, Staff Officer, Pilot Officer, Transport Officer, Mech Pilot |
| Vehicle Crew | Assault Crewman, Transport Crewman | |
| Engineering and Supply | Chief Ship Engineer, Requisitions Officer, Ship Technician | |
| Medical | Chief Medical Officer, Medical Doctor, Researcher | |
| Marines | Squad Leader, Squad Smartgunner, Squad Engineer, Squad Corpsman, Squad Marine | |
| Civilians | Corporate Liaison | |
| Silicon | Combat robots, Synthetic, AI | |
| Xenomorphs | Tier 0 | Larva, Minions |
| Tier 1 | Drone, Runner, Defender, Sentinel | |
| Tier 2 | Hivelord, Carrier, Hunter, Wraith, Bull, Warrior, Puppeteer, Spitter | |
| Tier 3 | Gorger, Defiler, Widow, Ravager, Warlock, Behemoth, Crusher, Praetorian, Boiler | |
| Tier 4 | Shrike, Queen, King, Hivemind | |
| Others | Zombie, Emergency Response Teams, Sons of Mars, | |
