Difference between revisions of "TGMC:Pilot Officer"
Qwerty4429 (talk | contribs) |
Qwerty4429 (talk | contribs) (Clearer intro) |
||
| Line 22: | Line 22: | ||
=== Also read [[TGMC:Guide to fire support|Guide to fire support]]. === | === Also read [[TGMC:Guide to fire support|Guide to fire support]]. === | ||
| − | As Pilot Officer, your primary duty is | + | As Pilot Officer, your primary duty is |
| + | |||
| + | * Piloting one of the dropships in order to transport the Marines. | ||
| + | * Flying CAS to help ground forces | ||
| + | * In absence of other command, taking responsibility for the mission | ||
=Playing the Pilot Officer= | =Playing the Pilot Officer= | ||
| − | First of all, you have to decide what you want to do. Either you do transport and make sure the Marines get to the planet and back to the ship, via Alamo or Tadpole. Or you want to support the marines on the battlefield with airstrikes via Close Air Support (CAS). | + | First of all, you have to decide what you want to do. '''''Either''''' you do transport and make sure the Marines get to the planet and back to the ship, via Alamo or Tadpole. Or you want to support the marines on the battlefield with airstrikes via Close Air Support (CAS). You are unlikely to be in two places at the same time. |
==Communication== | ==Communication== | ||
| Line 33: | Line 37: | ||
The radio commands are the following: | The radio commands are the following: | ||
| − | *.v for command | + | *'''.v for command''' |
*.m for medical | *.m for medical | ||
*.u for requisition | *.u for requisition | ||
*.e for engineering | *.e for engineering | ||
| − | *.s for fire support | + | *'''.s for fire support''' |
*.q for Alpha | *.q for Alpha | ||
*.b for Bravo | *.b for Bravo | ||
| Line 54: | Line 58: | ||
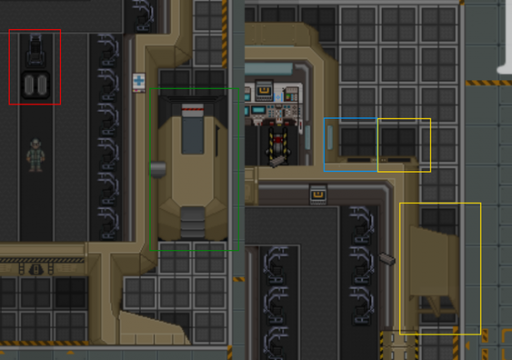
*<span style="color:green">Engine Slot</span>: This is where engine modules are installed, and Alamo has everything installed by default | *<span style="color:green">Engine Slot</span>: This is where engine modules are installed, and Alamo has everything installed by default | ||
*<span style="color:blue">Electronics Slot</span>: This is where electronics are installed, like the spotlight and the targeting system. | *<span style="color:blue">Electronics Slot</span>: This is where electronics are installed, like the spotlight and the targeting system. | ||
| − | *<span style="color:#dbcd34">Weapon Slot</span>: This is where the weapons are installed, like the rocket-pod or the sentry-deployment-system.<br /><br /><br /><br />Pillar of Spring has 2 powerloaders near the and the modules on the east side of the hanger while the Sulaco has 1 powerloader near the Condor and 1 powerloader near the fob drone and the weapon modules near the Condor and the interior and electronic modules near the Fob Drone. | + | *<span style="color:#dbcd34">Weapon Slot</span>: This is where the weapons are installed, like the rocket-pod or the sentry-deployment-system.<br /><br /><br /><br />Pillar of Spring has 2 '''powerloaders''' near the and the modules on the east side of the hanger while the Sulaco has 1 powerloader near the Condor and 1 powerloader near the fob drone and the weapon modules near the Condor and the interior and electronic modules near the Fob Drone. |
== Installing stuff on ships == | == Installing stuff on ships == | ||
| − | If you want to install a module or reload a weapon, you will need a powerloader (yellow robot). | + | If you want to install a module or reload a weapon, you will need a '''powerloader''' (yellow robot). |
*Right click the powerloader [image of the powerloader] and click “Enter powerloader” | *Right click the powerloader [image of the powerloader] and click “Enter powerloader” | ||
**Alternatively, you can clickdrag your sprite onto the powerloader. | **Alternatively, you can clickdrag your sprite onto the powerloader. | ||
| Line 63: | Line 67: | ||
*Move in front of the module or ammo pack and left-click on it to pick up | *Move in front of the module or ammo pack and left-click on it to pick up | ||
**You can carry two modules, simply switch active hand to carry another one. | **You can carry two modules, simply switch active hand to carry another one. | ||
| − | *Move to the slot and click left click on it, wait until installed or reloaded | + | *Move to the ship slot and click left click on it, wait until installed or reloaded |
**You can switch hands while doing an action. So you can install two modules at once. | **You can switch hands while doing an action. So you can install two modules at once. | ||
| − | **Note that for some weapons to be reloaded, you need to discard empty ammo box first. Do this by clicking the module. This also can be used to take off a module (it goes into your hand) | + | **Note that for some weapons (machineguns) to be reloaded, you need to discard empty ammo box first. Do this by clicking the module. |
| + | ***This also can be used to take off a module (it goes into your hand) | ||
</div> | </div> | ||
Revision as of 09:05, 18 February 2022

|
This page is a part of the TGMC wiki.
TGMC is a project based on the CM-SS13 codebase. |
| MARINE | |
 Pilot Officer |
Access: Dropship Piloting, Pilot Gear and CIC Difficulty: Rank: Warrant Officer(Starting), Chief Warrant Officer(25hrs), Ensign(50hrs), Lieutenant Junior Grade (100hrs) Class: Navy Supervisors: Captain, Field Commander, Staff Officer Duties: Fly the Alamo to the planet and back to transport the Marines, Support the ground-forces with CAS. Use the Tadpole. Guides: Guide to Fire Support, Guide to Vehicles Quote:You can be my wingman any time. |
Introduction
Also read Guide to fire support.
As Pilot Officer, your primary duty is
- Piloting one of the dropships in order to transport the Marines.
- Flying CAS to help ground forces
- In absence of other command, taking responsibility for the mission
Playing the Pilot Officer
First of all, you have to decide what you want to do. Either you do transport and make sure the Marines get to the planet and back to the ship, via Alamo or Tadpole. Or you want to support the marines on the battlefield with airstrikes via Close Air Support (CAS). You are unlikely to be in two places at the same time.
Communication
It’s usually a good idea to communicate a lot. Announce that the Alamo is going to depart soon with the general radio frequency (;). All TGMC personnel have access to the Common radio frequency. Only command roles start with tactical binoculars and also get access to the Command and Fire Support radio channel. All roles can get CAS flares.
Additionally you can inform medical (:m) about any wounded marines coming up, or you can communicate with a squad directly (:q, :b, :c, :d) to coordinate. You may also have to coordinate with the Requisitions Officer (:u) depending on his competency and budget.
The radio commands are the following:
- .v for command
- .m for medical
- .u for requisition
- .e for engineering
- .s for fire support
- .q for Alpha
- .b for Bravo
- .c for Charlies
- .d for Delta
The Hangar and Modules
The Hangar is where you will spend most of your time. It has two dropships, the Alamo which is the main dropship that marines take down, and the Condor which is a specialty CAS plane. Each ship has slots for special upgrades. The Alamo has two engine module slots, one interior module slot, two electronic module slots and four weapon module slots. The Condor has four weapon module slots, and an unremovable rotary nosegun.
- Rear Slot: This is the place where the Interior modules goes.
- Engine Slot: This is where engine modules are installed, and Alamo has everything installed by default
- Electronics Slot: This is where electronics are installed, like the spotlight and the targeting system.
- Weapon Slot: This is where the weapons are installed, like the rocket-pod or the sentry-deployment-system.
Pillar of Spring has 2 powerloaders near the and the modules on the east side of the hanger while the Sulaco has 1 powerloader near the Condor and 1 powerloader near the fob drone and the weapon modules near the Condor and the interior and electronic modules near the Fob Drone.
Installing stuff on ships
If you want to install a module or reload a weapon, you will need a powerloader (yellow robot).
- Right click the powerloader [image of the powerloader] and click “Enter powerloader”
- Alternatively, you can clickdrag your sprite onto the powerloader.
- Make sure your hands are empty before attempting to enter the powerloader.
- Move in front of the module or ammo pack and left-click on it to pick up
- You can carry two modules, simply switch active hand to carry another one.
- Move to the ship slot and click left click on it, wait until installed or reloaded
- You can switch hands while doing an action. So you can install two modules at once.
- Note that for some weapons (machineguns) to be reloaded, you need to discard empty ammo box first. Do this by clicking the module.
- This also can be used to take off a module (it goes into your hand)
Alamo
- The camera control console (left), which lets you view the different cameras of the dropship.
- The main control console (middle), which lets you fly the dropship.
- The weapon control console (right), which lets you fire your weapons or deploy your sentries.
Using the center console allows for more advanced commands than through the remote computers found on the LZs or in CIC. From here, you can not only designate a landing zone, but also toggle automatic cycling mode. Once toggled, the Alamo will automatically cycle between the last two chosen destinations, at an interval of your choosing (after the recharge delay). It is highly recommend to turn on automatic cycling so that it frees up PO's time to do better things and lets marines not yell in radio. Also note - once you click it on, it will begin the course immediately.
You can also toggle the lockdowns on the left, right, and rear doors of the Alamo. Doing so will prevent anyone from opening the door until the lockdown manually deactivated from the cockpit; either by the PO, or an invader. Note that the lockdown will lock the doors into their current state; toggling lockdown while a door is open will force it to remain open.The right part of the cockpit is the computer to deploy sentries to protect the Alamo from xenomorphs. This UI can also be used for fire mission if the Alamo is equipped with CAS arsenal, but it is recommended to use CAS for the Condor jet.Alamo's Responsibility
Communication is key with the Alamo. One of the primary mistakes when using the Alamo is not knowing when and where marines want to be at.
- Before the Alamo launch into one of the landing zones in planetside for marines' first deployment, ask what landing zone the forward operational base, or FOB, is in.
- Always tell marines when you are launching so that the marines heading to the Alamo is more motivated to haul ass.
- Install surgery table in Alamo; It will generally see more use than the machinegun hardpoint, as the back door almost always gets locked in the event of an assault.
How to Pilot Alamo
Piloting each dropship is fairly easy, you just have to click a few buttons and wait.
In the cockpit of the Alamo you will find the three main consoles.
- The camera control console (left), which lets you view the different cameras of the dropship.
- The main control console (middle), which lets you fly the dropship and lock or unlock the Alamo doors. If the Shrike or Queen touches this console the Alamo becomes locked which prevents the Alamo from working for a long time and also unlocks all doors. Do not lock all 3 sides of the Alamo otherwise they can lock the Alamo without touching the console.
- The weapon control console (right), which lets you fire your weapons or deploy your dropship equipment.
Alamo tips
- Roundstart, install spotlights and surgery table. These are found somewhere around Alamo.
- Turrets can also be installed, but are not very useful.
- DO NOT FORGET TO TURN ON THE AUTOPILOT
- Do not lock all 3 sides of the Alamo, this allows the xenos to lock the Alamo without touching the console. Always keep 1 side unlock at all times.
Close Air Support (CAS)
Close Air Support, or for short CAS, is your way of helping the marines. You can rain down hell on your enemies with bullets, rockets and lasers. But, for that the groundside marines need tactical binoculars or a lit CAS signal flare to laze a spot for you to bombard. Communicate with the squads accordingly to make sure they know CAS is available.
Preparation
But how do I kill my enemies, you ask? First you need to install the weapons. Note that the weapons you install are unloaded, and need to be filled with the ammunition from the ammo-storage room.
- By default, Condor has 30mm machinegun in the front, which is already loaded
- Take new weapons (which are usually lying around at roundstart)
- Install them, see above
- Load them with ammo
Starting a firemission
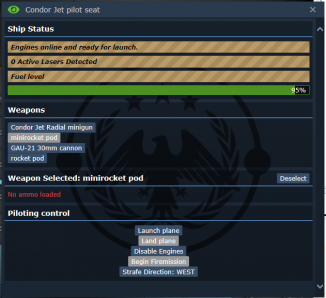
You execute CAS with your trusty Condor (blue plane), doing a fly-bys
- Сlimb into the Condor's cockpit (click)
- Spool (start) engines
- Take off - begin flyby
- Begin fire mission
- If there are CAS lasers, it will give you list of options to teleport to
- Otherwise it will semi-randomly teleport you to some location near marines
- Once fuel level is low, you will automatically land
- You can do this manually via "land plane", then "disable engines" after landing
- To get out of cockpit, press B (resist). Mid-flight B brings up flight menu.
- Refuel your plane with jerry cans by clicking the cockpit. Refuel cans by clicking the fuel tank.
Note: do NOT take off before ALAMO has landed for the first time. You will bug out.
Shoot stoopid benos
- Click "begin fire mission".
- You'll enter a map overview mode like the AI or Overwatch terminals where you can see anything within camera range of the ground forces, as well as the spot around the laze and the signal flares. You can fire on ANYTHING in sight of any marine on the ground! BUT all of your weapons will be danger close without the added range of the laser dot - this might not matter if your camera coverage is coming from a corpse's still-active helmet camera.
- All weapons are accurate, except for Illumination Flares, so don't worry about missing.
- In the plane menu, you can select the active weapon.
- Only one can be active at a time, but you can easily switch them. Just keep the menu open (B button to open it).
- Different weapons have different purposes, and fly time. Usual machinegun take 6 seconds to land, laser takes 1.
- Below you will see the button for direction. It shows how weapons will shoot
- For example, 'EAST' will launch bullets from left to right.
- If your fuel runs out, you'll land back on the ship automatically
3D printing death
- For your convenience, each hangar has CAS autholathe
- Print new weapons there!
- You can also purchase replacement ammunition at the dropship part fabricator.
- It is wise to consider cheaper options first. One napalm rocket is 200 points, which is also 12 mini rockets.
- Try laser beam! It is not spawned on any ships roundstart.
- Points generated as (Orbital level+3)*6 per minute
CAS tips
- Buy NVG from Cargo.
- It is in general very hard to land a clear hit on a xeno. You most often need at least 2 shots to kill even the weakest xeno, and therefore you won't be able to make kills by yourself. Try to really act as fire support, not as death from the sky.
- Large rockets have gib-zone in the center.
- If you land a direct hit, you are guaranteed to kill a xeno which has low bomb resist, like Boiler, Prae, and most low-tiers.
- If you don't, it's around 120 damage to xeno, so around 3 rockets to kill a full HP xeno. Not a great deal.
- Keep in mind the travel time to avoid friendly fire and so you dont end up saving an injured xeno by preventing marines from being able to chase.
- This happens absurdly often
- Xeno don't know what will be coming down - use this to your advantage.
- Illumination Flares can be used to trick xenos into running away, very useful if a marine is getting attacked.
- The Laser Beam is very quick to fire.
- Try to predict where xenos will go. Block their retreat paths. Hamper their attack.
- Use area denial weapons to block xenos from escaping.
- Especially useful when xenos make a push, to prevent injured ones from quickly retreating.
- Try to use cheaper ammunition first, fabricator point generation is pretty low.
- Ask for CAS lasers in
.s - Ask for green CAS flares in general channel.
- Also, you can make a crate with CAS flares from weapons vendor, and send it from Cargo
- CAS is most effective during defense. You cannot shoot without visions, and marines attacking mean that there would be a lot of FF.
- T4 xeno have very high bomb defense, and can shrug off even larger explosions.
Tadpole
The controls are accessed through the central console. Transit is performed similarly to the Alamo, with the caveat that the Tadpole doesn't go directly to the ground. After a transit phase, and Tadpole will wait in low atmosphere, designated by the surrounding clouds. From here, using the console will bring up the landing interface. After selecting a landing point and touching down, the Tad can be sent back into low atmosphere to reposition, or sent back to the ship from low atmosphere.
Anyone with access to Alamo cockpit can also operate the Tadpole. It has two slots for mounted turrets on the front, and one slot for mounted machinegun in the center. The TAD can land anywhere where the is no "hard roof" - like near Alamo, or near all plasma drills, but caves are (mostly) unavailable.Landing the Tadpole
The Tadpole can land in any unobstructed, open-air position. When using the landing interface, accessible by using the central console in low-orbit, you will see a birds-eye view of the battlefield, and an outline of the Tadpole in the center of the screen. If the entire outline is green, you have a viable landing area; if any tiles are red, they are obstructed, and the Tadpole cannot land in that position. You can rotate the landing outline using the rotate button at the top of your HUD (smaller side is your nose). Once a landing field has been selected, the outline will turn blue, indicating that the Tadpole will arrive there shortly.
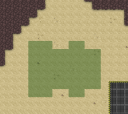 Fully green landing indicator. You're clear to land.
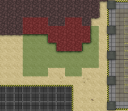 Partially red landing indicator. The landing zone is obstructed.
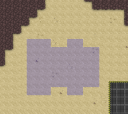 Blue landing indicator. The landing zone has been selected.
TAD tips
- Although instead of turrets, CAS weapons can be installed on TAD, they won't be able to shoot.
- Mounted machinegun has IFF and also able to turn 180 degrees.
- Useful to always have some first-aid kits, along with food. Marines will thank you.
Orders
As command staff, you have access to orders, which can be used to buff nearby troops with helpful effects. These also cause you to broadcast a quote over the radio(provided you have one) so people know when you're calling one out. After giving an order, there is a cooldown period until you can give another one. Give orders using the action buttons on the top-left of the screen.
| Command | Description |
|---|---|

Move order |
Increases movement speed. Great for chasing down or running away from xenos, or if you just want to move around fast in general, like on the ship. ROs love it! |

Hold order |
Increases pain resistance. Helpful since pain slows down move speed, makes you drop stuff, and overall just sucks to have. Also saves painkiller supplies for when it's needed more. |

Focus order |
Increases accuracy, which in turn increases total damage output because more shots actually hit the enemy. Also makes them hit friendlies more often, but that's out of your control, mostly. |
Modules
This is a list of all the available modules and what they do. Most of them are available at roundstart, but more can be purchased from the Dropship Parts Fabricator.
Dropship Part Fabricator
!
The Dropship Part Fabricator is the most important piece of equipment. It is used to make the modules and ammunition for the Alamo, Tadpole and Condor.
Spend your points wisely, they take a long time to replenish - (Orbital level+3)*6 per minute.
Interior Modules
Electronic Modules
Weapon Modules
Ammunition
Ammo travelling time is calculated by munition_travel_time * ((current_orbit+3)/6).
Example: 30mm Ammo Crate at orbit level 1 would be 6*((1+3)/6) which equals 4 seconds of travel time
Default level is 3.
Legend
For info on explosions, head to Marine Mechanics
Range (a, b, c) means EXPLOSION_DEVASTATE in range of a from center, HEAVY in b and LIGHT in c.
| TGMC Roles 
| ||
| TerraGov Marines | Command | Captain, Field Commander, Staff Officer, Pilot Officer, Transport Officer, Mech Pilot |
| Vehicle Crew | Assault Crewman, Transport Crewman | |
| Engineering and Supply | Chief Ship Engineer, Requisitions Officer, Ship Technician | |
| Medical | Chief Medical Officer, Medical Doctor, Researcher | |
| Marines | Squad Leader, Squad Smartgunner, Squad Engineer, Squad Corpsman, Squad Marine | |
| Civilians | Corporate Liaison | |
| Silicon | Combat robots, Synthetic, AI | |
| Xenomorphs | Tier 0 | Larva, Minions |
| Tier 1 | Drone, Runner, Defender, Sentinel | |
| Tier 2 | Hivelord, Carrier, Hunter, Wraith, Bull, Warrior, Puppeteer, Spitter, Pyrogen | |
| Tier 3 | Gorger, Defiler, Widow, Ravager, Warlock, Behemoth, Crusher, Praetorian, Boiler | |
| Tier 4 | Shrike, Queen, King, Hivemind | |
| Others | Zombie, Emergency Response Teams, Sons of Mars, | |
